MQTT gateway’s properties
INTRODUCTION
This protocol allows you to interact with IoT devices through a series of messages sent on the network within specific channels called Topics. This topic will pass inside a server called Broker, that make the connection possible in both sides (Client – IoT device).
GATEWAY’S PROPERTIES
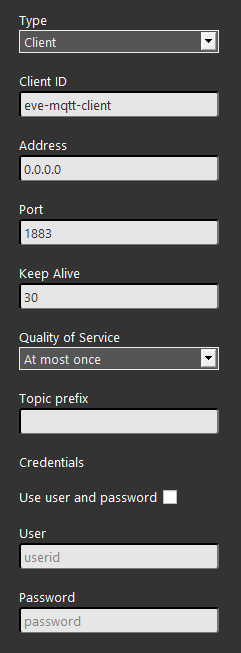
Type: This drop down allows you to select which type of function the X1 server will have. Bridge mode permette di impostare il server in modo che si possa avere una connessione con 2 broker differenti, Client mode standard mode that the server uses to be able to send and receive MQTT messages.
Client ID: Here you can paste the MQTT client ID that will allow you to register your client to the broker, as standard the client id is eve-mqtt-client if using the X1 server’s broker.
Address: Here you can put the Broker address that will be set to the X1 server. Localhost is the server address accepted by the X1 server in order to use its broker.
Port: Here you can put the MQTT port that the broker is using, as default the port is set to 1883.
Keep alive: Here you can set the keep alive time in seconds.
Quality of Service: This drop down allows you to choose which QoS level the connection with client and Broker will last.
Topic Prefix: This text field allow you to set a Topic prefix that the X1 server will consider when sending the messages.
Use user and password: This check box enable or disable the use of credential for a broker connection.
User: Here you can put your user name in order to connect to the broker.
Password: Here you can put your password in order to connect to the broker.
COMPONENT’S PROPERTIES
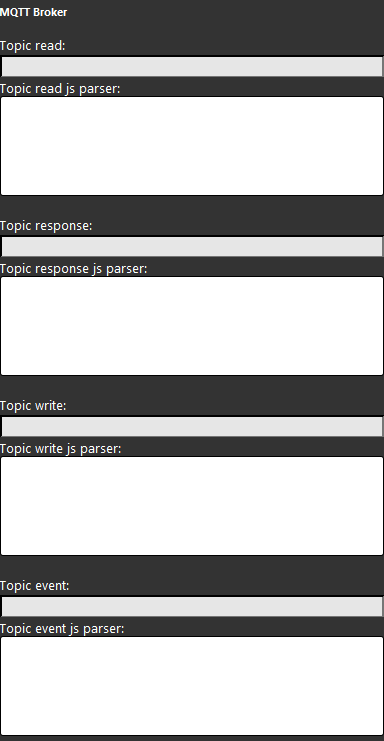
Topic: Here you can instert the topic that the messages will be sent to the IoT devices. For further information on how the topic and the payload are set inside the EVE system click this link.
JS parser: Here you can insert your java script in order to be able to send and receive the messages.
MQTT BROKER 2 GATEWAY
INTRODUCTION
Unlike the first MQTT gateway shown above, the MQTT 2 is managed by the Logic module. So please make sure to have the latest version.
Reminder before continuing:
- Download and Install EVE Logic plugin to enable plugins (link);
- After loading .eve project to the server, run EVE Remote app, log in and then wait a couple of minutes for logics activation.
GATEWAY’S PROPERTIES
Type: This drop down allows you to select which type of function the X1 server will have.
Bridge mode: Allows the connection to 2 different brockers.
Client mode: Standard mode that the server uses to be able to send and receive MQTT messages.
Port: Here you can put the MQTT port that the broker is using, as default the port is set to 1883.
Keep alive: Here you can set the keep alive time in seconds.
Quality of Service: This drop down allows you to choose which QoS level the connection with client and Broker will last.
Topic Prefix: This text field allow you to set a Topic prefix that the X1 server will consider when sending the messages.
Topic error: This text field allows to create a Topic where the MQTT configuration errors will be reported.
Credentials
Use user and password: This check box enable or disable the use of credential for a broker connection.
User: Here you can put your user name in order to connect to the broker.
Password: Here you can put your password in order to connect to the broker.
Certificate CRT: This certificate is given by the broker manager.
Certificate KEY: This certificate is given by the broker manager.
! Certificate Conversion
The KEY and CRT certificate configuration, required in some MQTT servers for the client authentication, requires a conversion before being set inside the MQTT gateway within the Ilevia’s configuration software Ilevia Manager. The conversion converts the certificate from Pkcs1 to Pkcs8.
Click the link below to download the software to convert the certificates.
COMPONENT’S PROPERTIES
Topic: Here you can instert the topic that the messages will be sent to the IoT devices. For further information on how the topic and the payload are set inside the EVE system click this link.
JS parser: Here you can insert your java script in order to be able to send and receive the messages.


