ETS PROJECT IMPORTATION
INTRODUCTION
The software Ilevia Manager allow to import an ETS project in order to speed up the Ilevia project configuration.
Project importation procedure
Step 1:
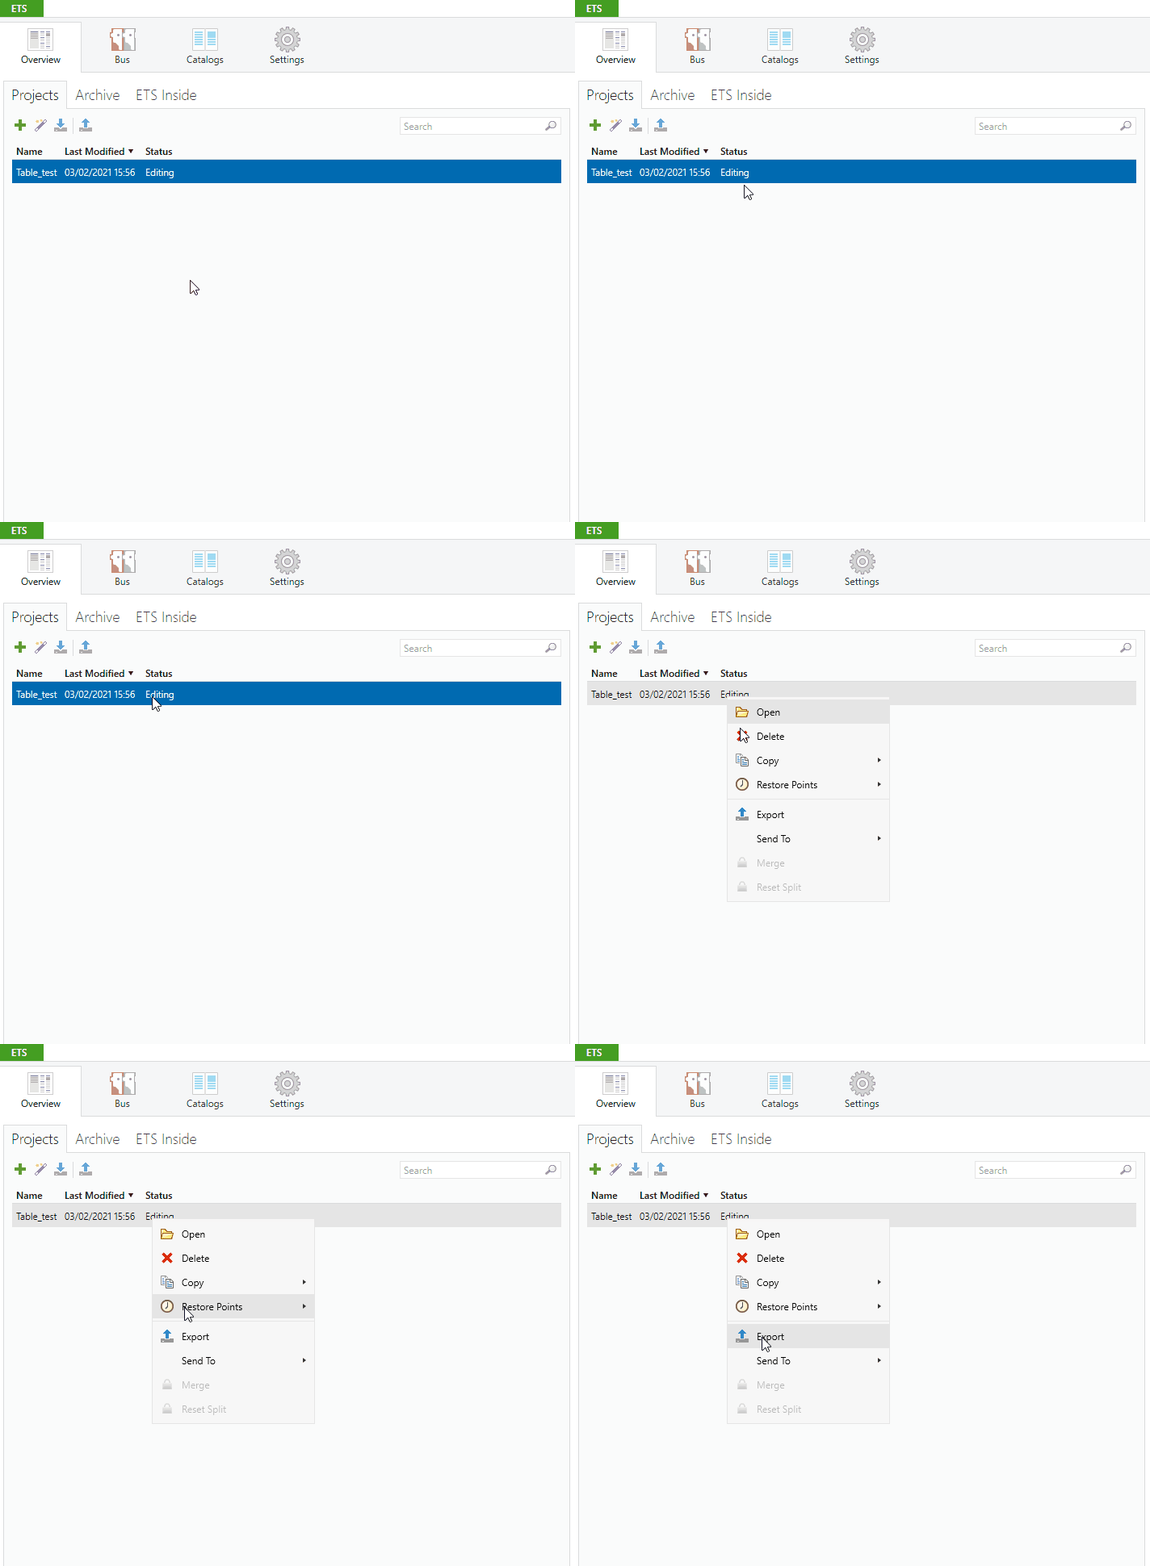
Open you ETS software and click on the project you want to export and right click on it.
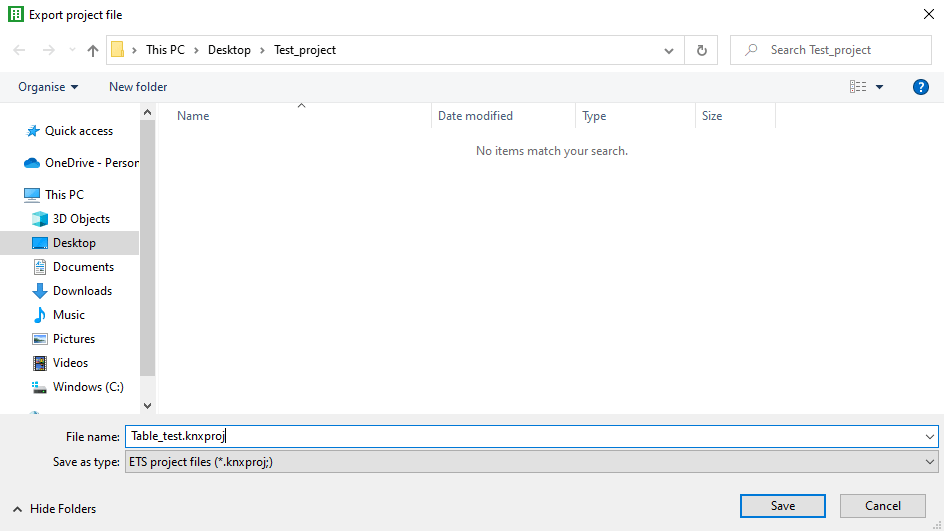
Once clicked on the export button a new window will apear, make sure the the extencion .knxproj is selected from the “Save as” drop down, then hit save.
Step 2:
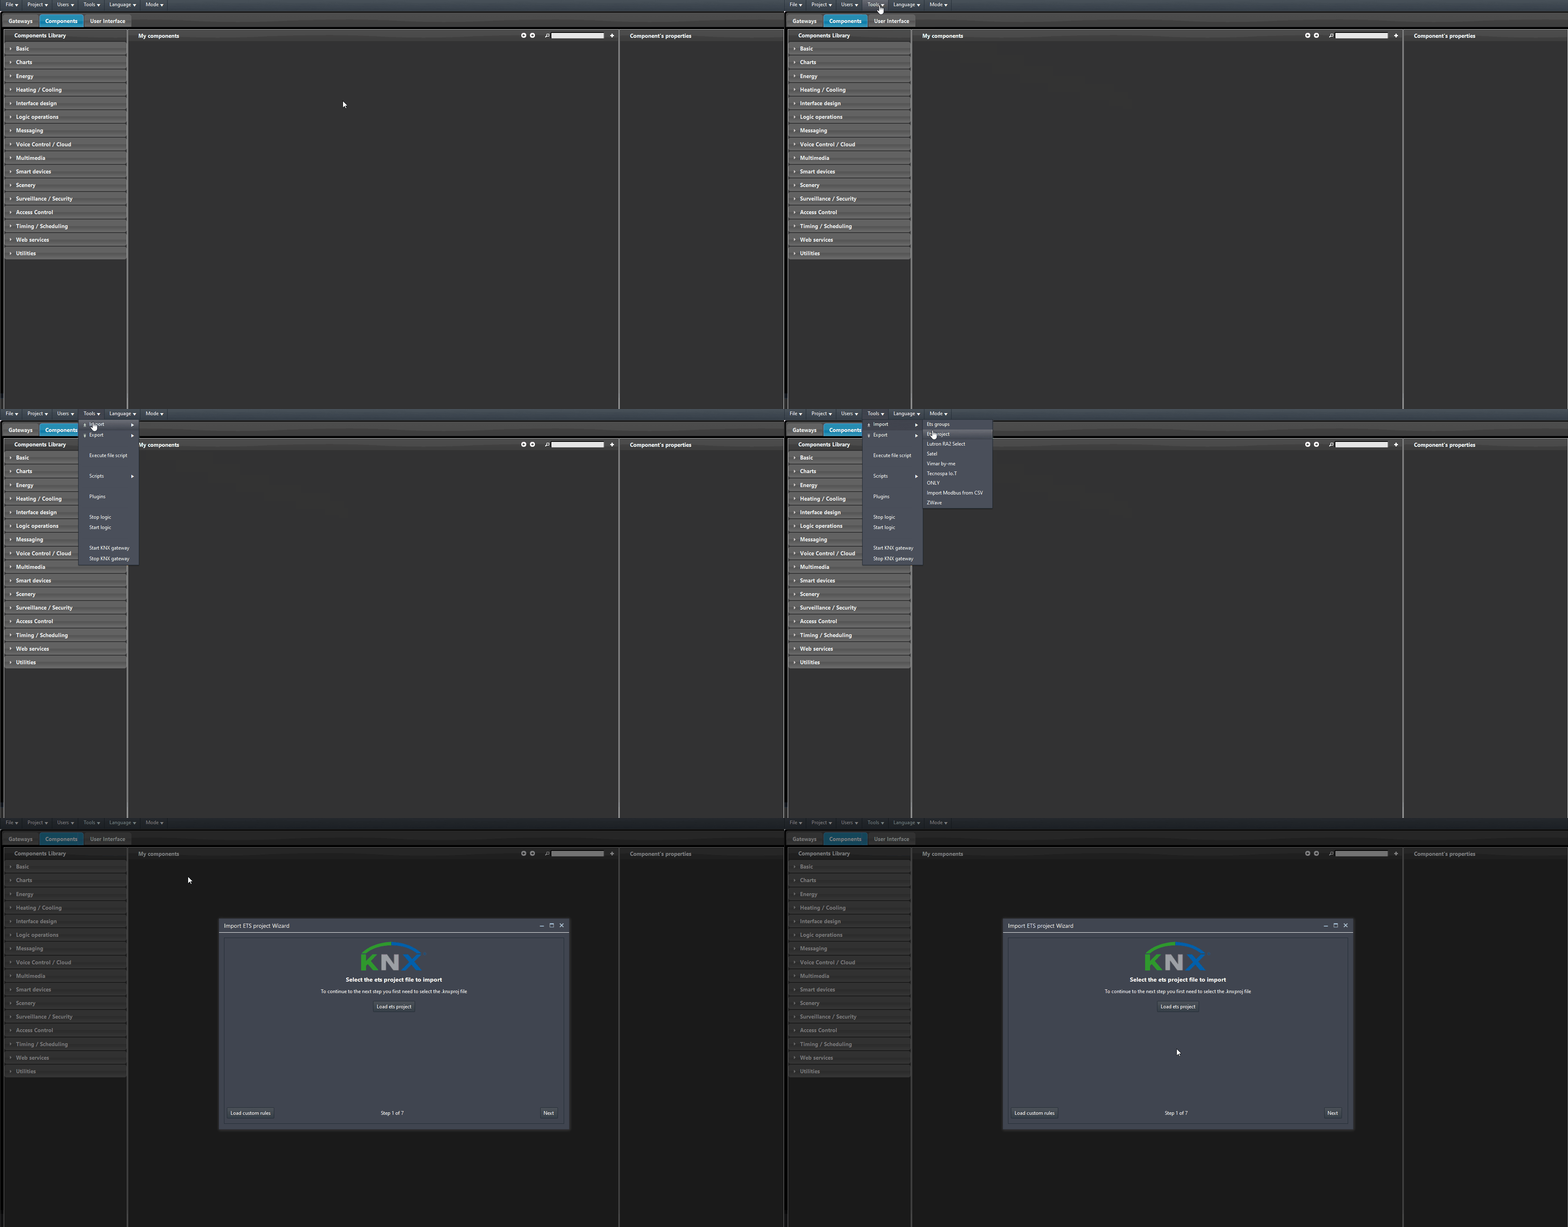
Now open the EVE configuration software Ilevia Manager and head to the “tools” menu on top of the screen, then click on the “Import” side menu and finally click on “ETS project“.
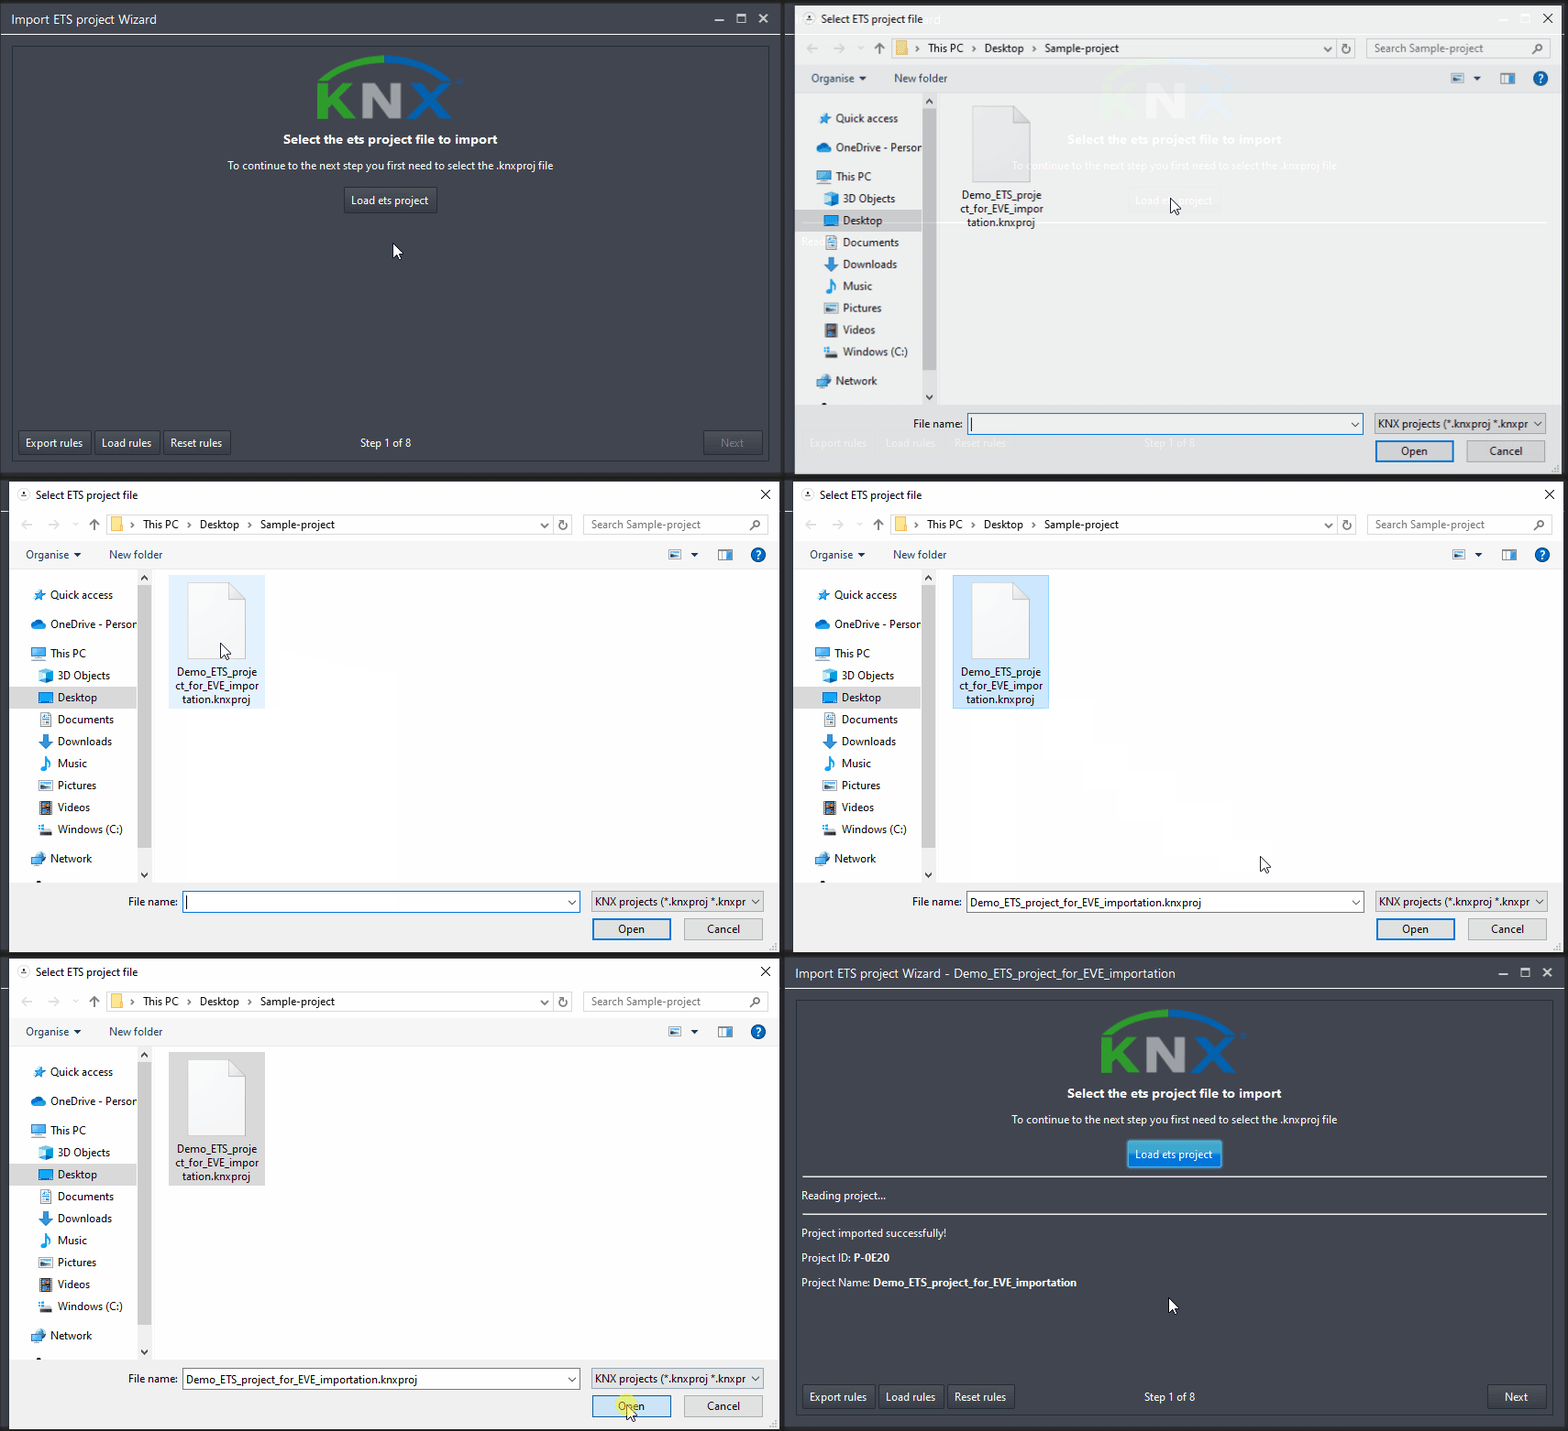
Once you clicked on “ETS project” a new window will appear in the middle of the screen, in order to open the ETS project inside Ilevia Manager click on the “import” button on the top left corner of the importation window.
ETS project password
Before importing the ETS project into the Ilevia manager, make sure to it has no password set to it. In order to remove the password from the ETS Project follow the next steps:
1: Hover the project on the ETS Main page and click Details;
2: Then select details;
3: Finally click Change password then Cancel password.
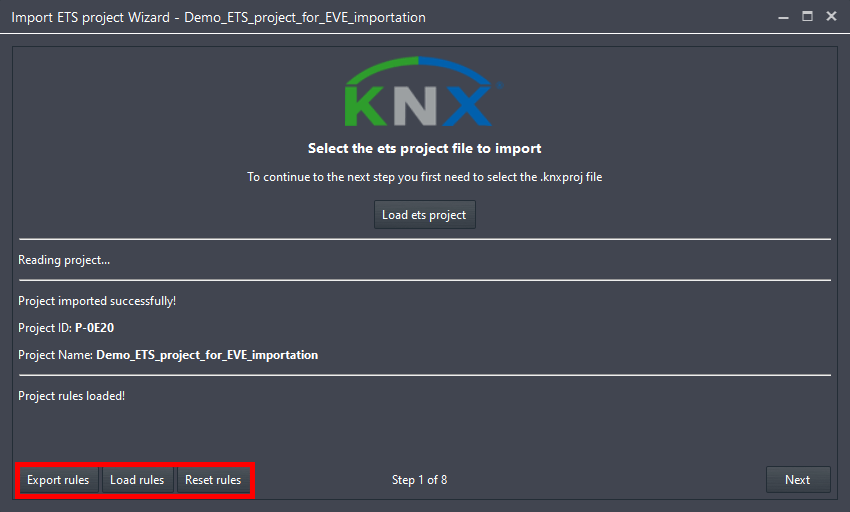
On the bottom left of the wizard’s window you can see three buttons. These buttons manage the rules created during the importation of the ETS project. Such as the coupling keywords (Command / Status, Up / Down – Stop) and the other settings done within the “Advanced mode” of the wizard.
![]()
Export rules: This button will allows you to export the rules created within the step in the ETS project wizard of Ilevia Manager.
![]()
Load rules: This button allows you to load a Rule file exported from other Ilevia Manager software.
![]()
Reset rules: This button will Reset the rules created in the Wizard during the ETS project importation.
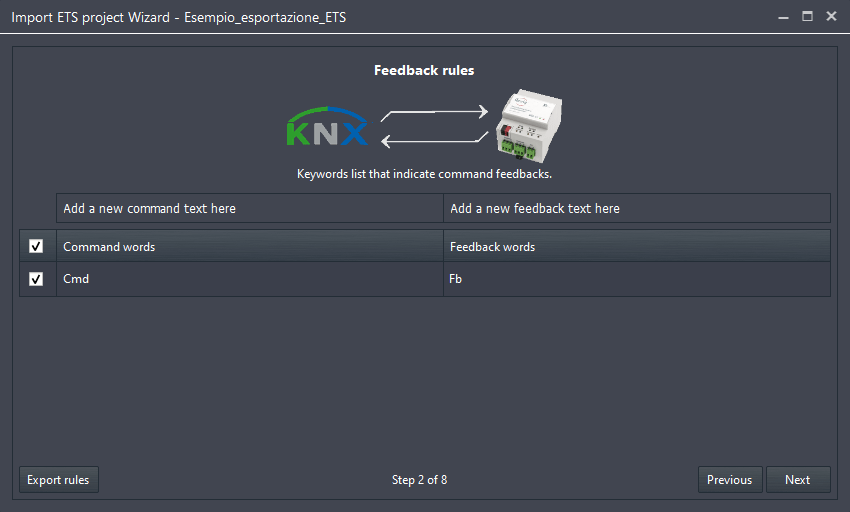
After loading the project hit next on the bottom right corner, here you will be able to set the keywards that the ETS wizard will use to pair the group addresses in order to create a single component in the EVE project with both group addresses already paired together. If this step is not set once the EVE project is created there will be two separate components, one with the write address and the other with the feedback. We suggest to choose keyword such as: Cmd for the comand address and Fb for the feedback one. This keywords will be checked in each name of the group addresses. This option can be toggled by Tick or Untick the check box “Enable feedback recognition based on text“.
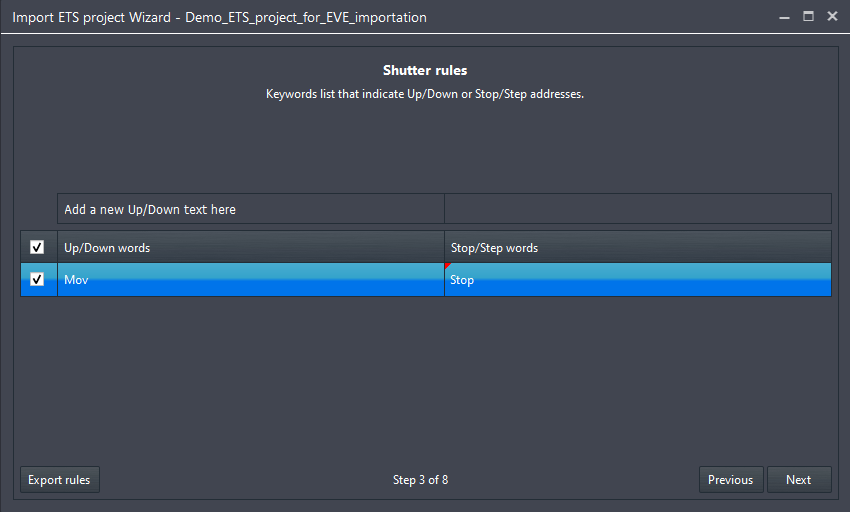
This step has the same functionality of the previous one with the difference that, in this step, you will be setting the coupling keyword specifically for the Shutters. So be careful to set the keywords in order to match the once you set in the ETS project.
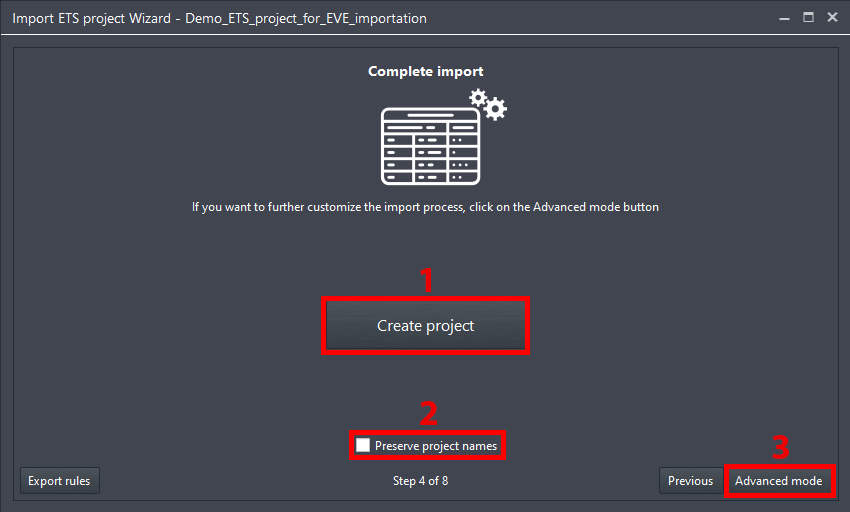
After setting up the keywords you can choose to 1. Create Project the project with the rules created in the previous steps or proceed with the importing procedure by clicking 2. Preserve EVE names checkbox, once activated, allows you to preserve the components, that have been already created from a first ETS project importation, to not get overwritten in case importation of the same ETS project. 3. “Advanced mode“, the advanced mode allows you to set more rules and filters for the importation.
Step 8:
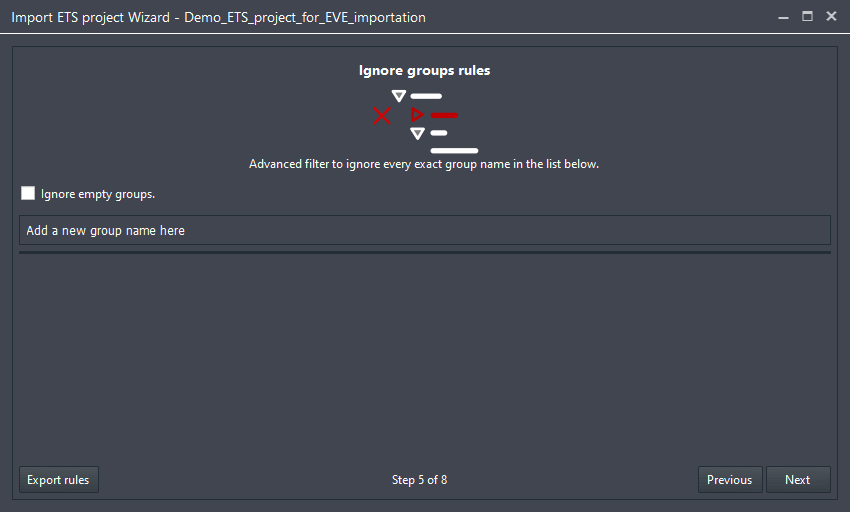
Once clicked “Advanced mode” a new step will be open, in this step you will be able to add a ETS group names that the wizard won’t import inside the EVE project. You can even decide to ignore importing the empty groups by leaving the check box “Ignore empty groups” selected.
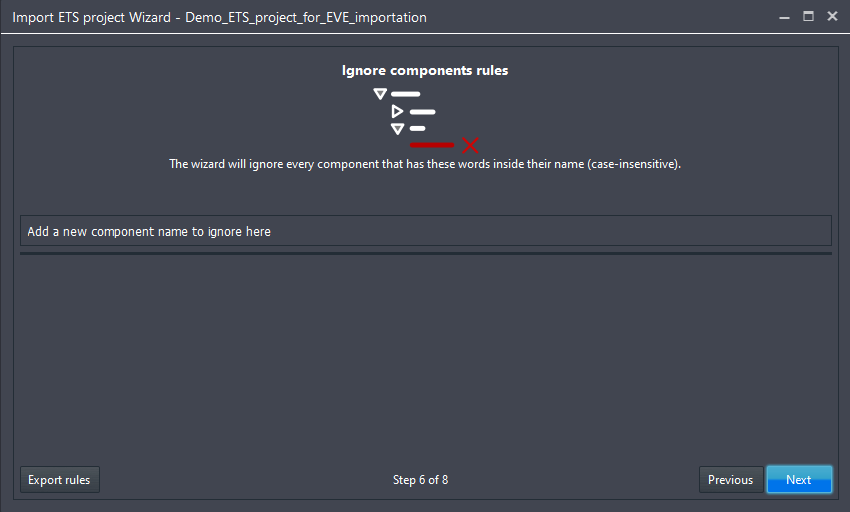
This step allows you to make custom rules to prevent the importation of the specified group address that contain the characters added in the list below. In the example below the components that contains the characters “—” won’t be imported inside the Ilevia Manager project.
Step 10:
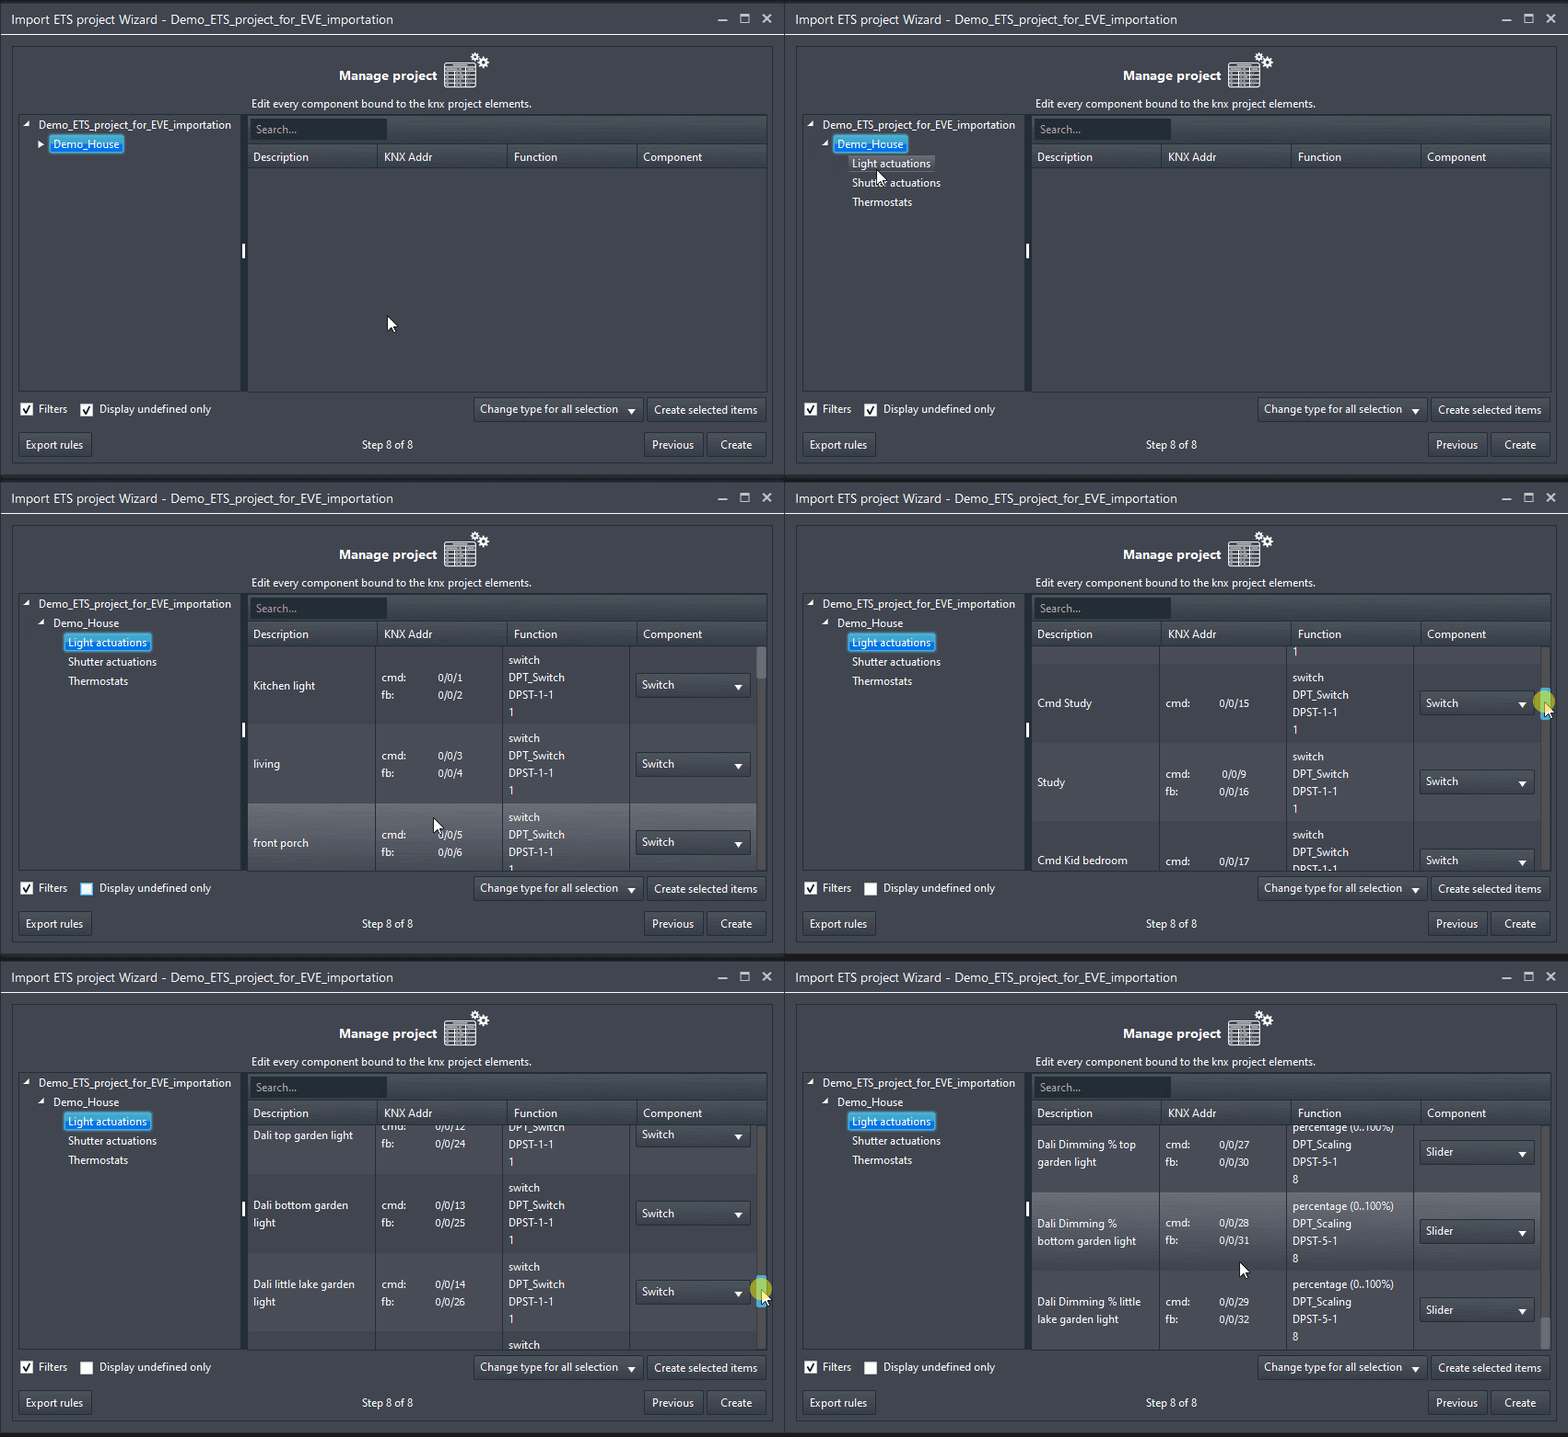
This is the final step of the ETS import wizard, first disable the check box called “display undefined only“, because if you don’t it will display only the group addesses which the wizard has not been able to recognise the “Dpt” (Data type). On the left side of the screen you will be able to see all the groups created inside the ETS software. On the right instead it is displayed all the group addresses already associeted with eachother with the component that has been applyed based on the Dpt you gave them in the ETS configuration.
Manage project functions
The seventh step allows to get the full project preview before importing it inside your Ilevia project. Below the components screen some more options are shown, here’s below each one of them explained.
Filters
![]()
If enable this check box will apply the filters you created in the steps before.
Diplay undefined only
![]()
If enalbed this checkbox will display only the object the wizard wasn’t able to recognise, this mean that none dpt has been specified to the group address.
Create selected Items
![]()
This drop down allow the user to select multiple components inside the wizard and then changing its type to the one selected inside this menu.
Export rules
![]()
This button, if pressed, will open the local files allowing you to save the rules set in the previous steps.
Save custom rules
![]()
This button allows the User to save the custom rules made in the steps before called rules.json file save in the following patch of your computer.
File path: Users\Admin\AppData\Local\EVEManager/knx_wizard
Previous & Create
![]()
Previous: Allows the user to get back of one step in the wizard importing procedure
Create: Will import the KNX project and so create the components inside the EVE project applying the rules you set up in the wizard procedure.
|
Filters
|
If enable this check box will apply the filters you created in the steps before. |
|
Diplay undefined only
|
If enalbed this checkbox will display only the object the wizard wasn’t able to recognise, this mean that none dpt has been specified to the group address. |
|
Component selector
|
This drop down allow the user to select multiple components inside the wizard and then changing its type to the one selected inside this menu. |
|
Create selected Items
|
This button allows to create only the selected components inside the components list on the right side of the wizard window. |
|
Export rules
|
This button, if pressed, will open the local files allowing you to save the rules set in the previous steps. |
|
Save custom rules
|
This button allows the User to save the custom rules made in the steps before called rules.json file save in the following patch of your computer. File path: Users\Admin\AppData\Local\EVEManager/knx_wizard |
|
Previous & Create
|
Previous: Allows the user to get back of one step in the wizard importing procedure Create: Will import the KNX project and so create the components inside the EVE project applying the rules you set up in the wizard procedure. |

