

 Scenario
INTRODUCTION
It allows you to create a sequence of actions timed operated by the user or any other event.
USE CASE
- The User wants to create a series of events when he come back home such as turn on the living room lights and turn the thermostat temperature to 25 C°

COMPONENT’S PROPERTIES
GHOST
This component’s sample is made by using GHOST gateway.
Please refer to “Gateways / Protocols” guide in order to get further info.
Virtual Feedback: please refer to the “KNX protocol” guide;
Run scenery on startup: Once the project is uploaded to the server;
Loop: It allows to keep the scenario‘s actions going on loop once started;
Trigger: This is the trigger component (optional) of the scenario (Switch or Timer)
Start when Off: The scenario runs when the trigger is off;
Scenery’s actions: this is the list of actions that the scenario will execute when activated:
Category: component’s category;
Name: component’s title;
Drop down: select the command choice;
Delete: select bin to remove the component from scenario;
Add a delay: it allows to add delay timers on the scenario’s actions list;
Note. Scenario configuration can be easily carried out by dragging and dropping all the necessary components from “My components” area to Trigger drop-down menu and Actions box.
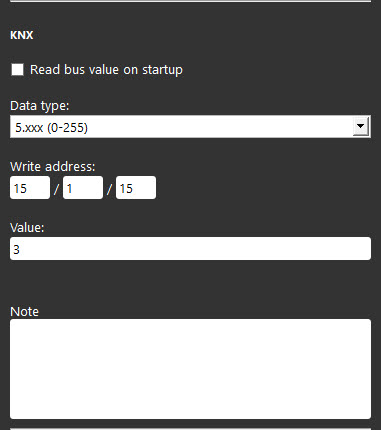
KNX
You can also configure scenario on ETS software and simply enter its Write address on Scenario component’s properties. This is the case of a Scenario component configured with KNX gateway.
Here is a component’s properties sample made by using KNX gateway.
Read bus value on startup: please refer to “KNX protocol” guide;
How to set up a virtual scenario
Add the scenario within the My components area and make sure it has EVE-GHOST as its gateway.

Then add the component you want to manage with the scenario. Then choose which action the component you added will do once the scenario is triggered.

If you need you can also add delays between actions. The dealy can be set with Minutes, Seconds or Millisends.

How to set up the loop option in the scenario
Once you ckecked the Loop checkbox it will be asked to add an initial delay inside the Scenario’s Actions, as default the delay will be set to 5 second.

Add a switch component within the project. Then link it with the scenario by selecting it from the Trigger component drop down.

 EVE Remote Plus
Three different view mode possibilities: “CLASSIC”, “MODAL” and “HIDDEN”. Learn more about the component’s view modes.
CLASSIC VIEW MODE
Here is the visual result of the component on EVE Remote (Classic Style).
Scenario is displayed with an icon that will start pulsing once the component is triggered.
![]() Scenario “All lights On” (scenario mask)
Scenario “All lights On” (scenario mask)

MAP VIEW MODE
This is just one of the visual result possibilities of the component on the EVE Remote (Map Style).
Icons can be customized depending on your necessities from symbol to
In this case, we can see the default icon layout:
Any Scenario ⇒ Scenario icon
![]() Scenario “All lights On” (customizable icon)
Scenario “All lights On” (customizable icon)
