 Recorder
INTRODUCTION
This component keeps track of data from sensors, counters and switches. The store of information can be used later by other components, such as the Chart component, for creating graphics. There is also the possibility to define the criteria for recording data.
USE CASES
- The user wants to record the produced energy by his solar panels plant;
- The user wants to record the exernal temeprature in order to be able to compare it with the previous years one;
- The user wants to record the house levels of Co2 to get an Idea of the air quality during the day.

COMPONENT’S PROPERTIES
GUI
This component’s sample is made by using Graphic UI gateway.
Please refer to “Gateways / Protocols” guide in order to get further info.
Data to record: Components’ list which you want to record the data from. You can choose components that rapresent binary states (e.g. Switch) or a numeric value (e.g. Info). Selection is carried out by dragging components from “My components” area to the list box.
Recording interval [s]: It involves recording a behaviour after every specified time period [seconds]; When the field is left empty or filled with “0” value, Recorder keeps recording any behaviour every second.
Disable recording: Add a switch component in order to stop and restart the data recording any time it’s needed.
IMPORTANT SETTINGS FOR THE RECORDER COMPONENTS

If you are recording data coming from a Info component set with a KNX gateway , the check box “Raw value numeric only” must be enable to record the raw value (without measurement units).

Remember to set the unit of mesurement of the Info component from the “data type” drop down menu within the component’s properties. This setting allows the Ilevia system to differenciate if the data is coming from a sensor or from a energy counter, making it possible to build different kind of chart.
POWER RECORDING
The Power is a value that changes frequently, In order to avoid recording an execive quantity of data it is handy to set a Recording interval (that can go from 30 – 60 seconds). This means the Recorder will record each time the value changes if any interval is set.
RECORDING LARGE QUANTITY OF DATA
In case of high rate recordings, we suggest to set up the External recorder component. This component allows you to record and then send the recorded data into external device such as: NAS (Qnap, Synology) or clouds.
Reminder before continuing:
- Download and Install EVE Logic plugin to enable plugins (link);
- After loading .eve project to the server, run EVE Remote app, log in and then wait a couple of minutes for logics activation.
HOW TO DISPLAY THE RECORDED DATA WITHIN THE WEB PAGE
How to access the recorder’s web interface?
Follow this procedure in order to access the recorder web interface:
- Open your web browser and insert the Ilevia’s server IP address;
- Once connected to the web page of the server click on the tect itme Recorder that you can find on the right side box called Installed plugin.
The component’s configuration foresses the apply of the label “Show in recorder web page” within the component’s properties in order to consult its chart inside the recorder’s web page.

Add a title to the component using the following syntax:
Group name | Component name

Once inside the the ilevia server web page, click on the link “Recorder” displayed on the right side of the web page under the text item Installed plugin,

By clicking the drop down menu Choose your components…, you will be able o select the components added previously with the tag Show in recorder web page.

Chart visualisation
The visualization of the data of an energy counter, the chart contains the data recorder till that moment. The data visualization can be personalized with the several time laps modes: hours, days and months.
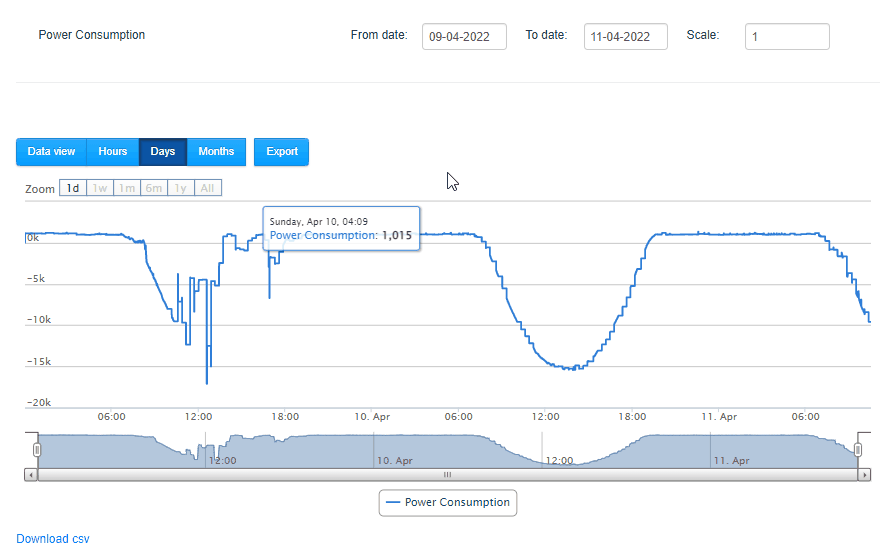
Power consumption chart
Graph data can be downloaded in a .csv by clicking the link Scarica .csv.

By clicking the Export button you can save the data in .xlsx format.
Make sure that your browser does not block pop-ups, if that is the case it will be enough to allow them. The image below uses Google Chrome as a reference:

CREATING AND IMPORTING A DATA BACKUP
EXPORT 1
The EVE server makes possible to export the Recorder database. In order to enter the EVE server via sftp protocol you will need the open source software such as Filezilla.
In order to connect inside the sftp server you will need to insert in the Host field “sftp://” followed by the IP address of the Ilevia server and on Username and Password you must enter eveweb for both the creadential fields, finally press Quick connect.

Once Connected into the EVE server, you will asked to click on the right folder path in order to reach the file .sqlite file that contains the recorder data.
The path in order to find the desired file is this:
/http/logic/plugins/Recorder/config/plugindb.sqlite.

EXPORT 2
By entering the following link inside your browser’s search bar you will be able to download the plugin.sqlite that contains the data from the Ilevia server.
Ilevia_server_IP_address/logic/plugins/Recorder/config/plugindb.sqlite
IMPORT
If you want to restore the database file in case of problems with a previously saved file, you can import it into the server by following this procedure:
Using software such as FileZilla that allows you to access via SFTP protocol to our server by entering the IP address on HOST and entering as Username and Password eveweb we can navigate within the directory containing our interested file: plugindb.sqlite.

Once identified, just drag the backup file within the window and accept overwriting:
