WEEK TIMER CALENDAR SAMPLE PROJECT
INTRODUCTION
The “Week Timer Calendar” component can be configured in a number of ways, so we have divided our project into multiple examples, from the simplest to the most complex.
First example project
The purpose of this example is to show you how to use the Week Timer Calenda component in managing the Week Timer activation manually.
Specifically, we use the Irrigation component management where two Week Timers are configured:
- week not rainy: activates the irrigation system every day of the week from 21:00 to 23:30;
- week rainy: always leave the system deactivated.
Preparing and loading the project in EVE Manager:
- Unzip the file;
- Open EVE Manager, go to the top left, File – Open – press “Ok” on the message that appears and select the file just decompressed;
- Start the virtual machine or the Raspberry;
- Download and Install the Logic by following this guide.
Open EVE Manager, after the project is loaded, the components that are used to configure the project are visible in the “My Components” area:
- 1 Week Timer Calendar
- 2 Week Timer
- 1 Drop Down
- 1 Switch

Head to the “Week Timer Calendar” component to see its configuration:
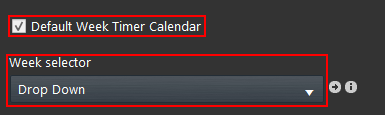
- In the first “Week selector” field, we have selected the drop down component as a selector, ie the one to allows that selects the week that you want to activate (Picture 1);
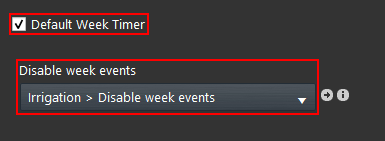
- Make sure to select the Week Timer that the server will consider as default, the check box inside the Week Timer component propertie (Picture 2)
- The “Disable Week Events” parameter is not mandatory, this makes possible to disable and enable the week event recorded in a specific Week Timer.
Picture 1
Picture 2
After uploading the project to the server, clicking on the top of the EVE Manager on “Project” menu – Upload to server, here enter the IP address of your EVE Server, as the “admin” user and as password “password”, login to the EVE Remote Plus app.
LOGIN ACCOUNT CREDENTIALS:
User: admin
Password: password
In this interface, pressing the drop down menu icon, represented by the “Sun” or “Rain” icon, we can choose whether to enable or disable programmed irrigation depending on whether the week was rainy or not.
To change the timetables of two Week Timer, just access timer setup mode. For more information on this procedure, please refer to this guide.


Click the link below to download the first Week Timer Calendar demo project and try it your self.
Second example project
The purpose of this example, which you can download at the end of this paragraph, is to show you how to use the Week Timer Calendar component in managing the Week Timers.
Specifically, we use the component to manage an outdoor lamp where three Week Timers are configured:
- Winter: timer of the winter period that turns on the lamp every day from 5 pm to 11.30 pm;
- Summer: timer of the summer period that turns on the lamp every day from 9 pm to 11.30 pm;
- Mid season: Timer for intermediate periods that light the lamp every day from 6 pm to 11.30 pm;
Preparing and loading the project in EVE Manager:
- Unzip the file;
- Open EVE Manager, go to the top left, File – Open – press “Ok” on the message that appears and select the file just decompressed;
- Start the EVE Server;
- Download and Install the Logic by following this guide.
Open EVE Manager, after the project is loaded, the components that are used to configure the project are visible in the “My Components” area:

Place yourself in the Week Timer component to see its configuration:
- Select the week timer that will be taken as default by meking sure the checkbox Default week timer is selected (Picture 1)

Picture 1
After uploading the project to the server, clicking on the top of the EVE Manager on “Project” menu – Upload to server, here enter the IP address of your EVE server, then enter the credentials as User login to the EVE Remote Plus app.
LOGIN ACCOUNT CREDENTIALS:
User: admin;
Password: password;
In this interface by clicking on the Week Timer Calendar component, you can select which days to run each Week Timer, except the one set as “default” in EVE Manager that will run on days not selected.


Click the link below to download the Second Week Timer Calendar demo project and try it your self.
Third example project
Specifically, we will have a Week Timer Calendar component to handle the lamp in the garden, as seen in the previous example, and another that manages the rest of the house’s devices represented by two roller shutters.
Preparing and loading the project in EVE Manager:
- Unzip the file;
- Open EVE Manager, go to the top left, File – Open – press “Ok” on the message that appears and select the file just decompressed;
- Start the EVE Server;
- Download and Install the Logic by following this guide.
Open EVE Manager, after the project is loaded, the components that are used to configure the project are visible in the “My Components” area:
The Two Week Timers are used to set the default opening hours of the shutters and those for the holiday week.

Enter in the Week Timer Calendar component to see its configuration:
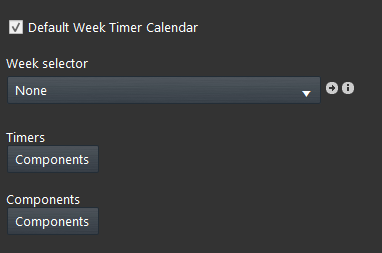
- The only configuration made here is to set the component as default by clicking on the Default Week Timer Calendar” check box;
- This setup allows you to set a Week Timer Calendar where you can enter all Week Timers in the project. (Picture 1)
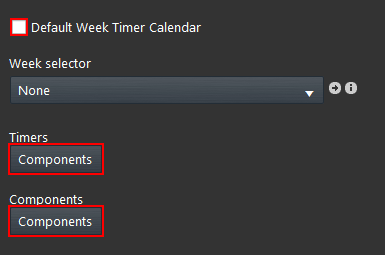
- In the second Week Timer Calendar you will have to add the Week timers and the Shutter components inside the corrispective lists. Insert the Week Timers inside the Timer components list and the shutters inside the other list called Component (Picture 2)
Picture 1
Picture 2
After uploading the project to the server, clicking on the top of the EVE Manager on “Project” menu – Upload to server, here enter the IP address of your EVE server, then enter the credentials as User login to the EVE Remote Plus app.
LOGIN ACCOUNT CREDENTIALS:
User: admin;
Password: password;
In this interface by clicking on the Week Timer Calendar components icons, you can select the days in which to run the various Week Timers set, except those set as default in EVE Manager that will run on days leave it free.


Click the link below to download the third Week Timer Calendar demo project and try it your self.
Fourth example project
Preparing and loading the project in EVE Manager:
- Unzip the file;
- Open EVE Manager, go to the top left, File – Open – press “Ok” on the message that appears and select the file just decompressed;
- Start the EVE Server;
- Download and Install the Logic Module by following this guide.
Open EVE Manager, after the project is uploaded, groups divided by project in the “My Components” section are visible.

After uploading the project to the server, clicking on the top of the EVE Manager on “Project” menu – Upload to server, here enter the IP address of your EVE server, then enter the credentials as User login to the EVE Remote Plus app.
LOGIN ACCOUNT CREDENTIALS:
User: admin;
Password: password;
EVE Remote Plus View


In this interface by clicking on the Week Timer Calendar components icons, you can select the days where to run the various Week Timers set, except those set as default in EVE Manager that will run on days leave it free.
Now that there are more Week Timers, it is important, during their configuration, be careful to select the Week Timer that matches the component we are configuring.We have to pay same attention when we go to select Week Timer execution days in calendars.

Click the link below to download the Fourth Week Timer Calendar demo project and try it your self.