

EVE REMOTE PLUS
INTRODUCTION
This manual contains the necessary information to interact with the app EVE Remote Plus.
Thesystem provides you with a free app for controlling your EVE installation remotely.
The app is available for Android and iOS smartphones/tablets and for Windows OS or Mac OS X laptops / Pcs.
The mobile version is available on Google Play store and Apple App store.

The app for desktops can be downloaded on our website under the downloads section.
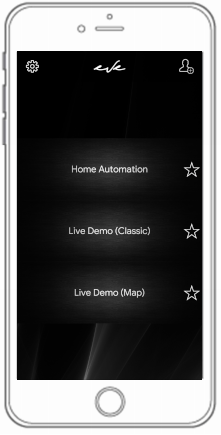
Start Screen
Once EVE Remote Plus is started, you land on the Start Screen. On the top left corner,
you find the gear icon to access the Settings, on the top right corner the user icon to start configuring a New Account.
In the middle of the screen are displayed all the accounts you configure (Accounts List).
There are two accounts configured by default to let you test our demo corner installation.
These default accounts are used to show you two samples of the user interface and can be
deleted at any time.
Settings
To access the Settings, click on the gear icon on the top left corner of the Start Screen.
- Version: App version and date of the latest app release;
- Pin: Checkbox to enable a passcode and icon to set your personal passcode;
- Force orientation:: Checkbox to enable a default screen orientation (portrait / landscape);
- Force screen always on: Checkbox to always enable the default screen orientation;
- Logout when in background: Checkbox to enable logout when the app is on running app list;
- Use effects: Checkbox to enable special effects within the app (ex. vibration, sounds, …);
- Power consumption: Dropdown menu to choose the app consumptions mode;
- Contents size: Dropdown menu to select the size of contents (texts / icons);
- Writing system: Dropdown menu to choose the default setting for your writing;
- Auto Resolve IP: Checkbox to allows to 4G connection even if when there is a dynamic IP;
- Show pin on idle: Checkbox to enable the requirement of the passcode after an idle time;
- Screen width: Screen width, the value is detected automatically;
- Screen height: Screen height, the value is detected automatically;
- Quit: Icon to exit from the application.

New Account
- Title: Text area where you can enter a customized title for your personal;
- Auto search: Dropdown which shows all the active servers into the network;
- IP address: Text area where enter the IP address of the server (ex. 192.168.X.XXX);
- Username: Text area where enter the account username configured by the administrator;
- Password: Text area where enter the account password configured by the administrator;
- Title color: Click the color picker icon to customize the color of your account title;
- Picture: Click the camera icon to take a photo to be used as an account picture;
- Picture color: Click the color picker icon to customize the color of your account picture.
sure that all of them are filled in order to successfully create the account and to login.

Accounts List
In the middle of the Start Screen are displayed all the accounts you configured on your app.
It is possible to configure countless accounts, also to control different installations. All your accounts are displayed in alphabetical order,
however in a situation where many accounts are displayed, it could be helpful to choose which accounts to display on top of the list.
Tap the empty star icon of the account area to set that account as one of your preferred.
When selected, the star icon becomes colored. With the next run of the app,
all the starred accounts will be displayed in alphabetical order before all the other accounts.nce.
When only one account is set as your favourite, with the next run of the app, the Start Screen
speed up your controlling experience.

To edit an account simply swipe the account area from right to left with your finger.
Doing so, a red button will be revealed. Click on “Edit” to access the account panel where you can edit/delete the account.

Account Login
To log in to the account, you want to use, simply tap on the account area (previously configured).
Remember, when setting an account as your favourite one,
the Start Screen display is skipped and the connection to the starred account is automatically done by EVE Remote Plus app.
installer to solve the issue. Report to your installer the message displayed on the connecting
bar of your EVE Remote Plus app which will helps him to detect the problem.
Home Screen
Once you have successfully loged in, you will land on the Home Screen of your user interface (previously created on EVE Manager configuration software).
On the top left corner, you find the home icon which brings you back to the Home Screen any time you click on it, wherever you are in your navigation through the user interface.
On bottom left corner the exit icon to go back to Start Screen of your EVE Remote Plus

Information
When you press the home icon for longer than a second (tap and hold) you access a Menu which shows you a row of icons corresponding to several configurations available for the user.
Click on the info icon to access a list of further information about the server you are connected to.

Configurations
When you press the home icon for longer than a second (tap and hold) you access the
Configurations menu which shows you a row of icons corresponding to several configurations
available for the user within the EVE Remote Plus app.
At the moment, only an icon is displayed: a clock icon to set timers.
In order to enable the management of timers feature, it is necessary to add the “Week Timer” module within the installation project using EVE Manager configuration software.
Timers configuration
It is possible to set up weekly/monthly schedules to automatically launch scenes and events. It won’t ever be necessary to worry about the smart building management during your daily routine due to the fact that EVE will automatically trigger events based on system calendars.
Timers Configuration Mode
To access timers configuration mode, tap and hold the home icon, then click on the desired clock icon. Once selected, the home icon begins to flash of a different

 Week Timer
Click on the object to access the Week Timer Screen. On top of the screen, you find the title of the object you have selected (ex. Abat Jour).
Below there is a summary area, filtered by day (WeekLine),
where all the created events for the selected object are displayed (Events Rows).
You can also find a scroll bar to select a different Week Timer (if more than one is set within theproject).
On the top right corner of the Week Timer
on the top left corner the arrow icon to go back to the user interface navigation.

New Event
To add a New Event click on the icon on the top right corner of the Week Timer Screen (if more than a Week Timer is set within the project, pay attention to the one you are configuring).
Once done, the Event Configuration Screen is displayed in front of you.
Here you set a timer for the selected object.
Tap on the day/s on the Week Line to choose for which days of the week you want to set the timer
All the selected days are surrounded by a
On the top right corner of the Event Configuration

As soon as you add a new event, its details are summarized through an editable Event Row on the Week Timer Screen.
Tap on top left corner icon to go back to the Week Timer Screen of the object.

Event Row
Each Event Row showed on the Week Timer Screen summarizes the details of each event and allows to complete the configuration. From left to right you find:
- A switch icon allows to define whether the event has to turn on or to turn off the object;
- A timer display and a week display (not editable) summarize the event’s details;
- A little horizontal switch that allows defining whether the event is enabled or disabled.

Use the Week Line (filter by day) on the Week Timer Screen to move towards the week events of the specific object and edit each event depending on your needs.
Providing you access to the timers configuration mode, you can edit each event any time you want.

Timer Icon
When finished, go back to the user interface using the arrow icon on the top left corner of the Week Timer Screen and tap and hold the home icon to exit the timers configuration mode.
Each object for which at least an event is set will display a timer icon below its title to facilitate the recognition.

Multiple Week Timers
Instead of requiring you to keep editing your timers depending on your changing routine or holiday plans,
we have designed the possibility of using multiple Week Timers.
This allows to create events and define to which kind of week they refer.
For example, this is helpful to distinguish your typical week from your holiday week.
There is always a Primary Week Timer within the project, plus it is possible to set other Secondary Week Timers (this needs to be done using EVE Manager software
configuration) and use the Week Timer Calendar component to select the days of the year in which the Secondary Week Timer needs to be considered by the system to trigger your events.
In order to enable the management of timers feature, it is necessary to add the “Week
Timer” module within the installation project using EVE Manager configuration software.
Tap on the calendar icon to access the Week Timer Calendar Screen. On top of the screen, you find the title of the object you have selected. Below there is the calendar area for days selection.
At the bottom of the page, you find the scroll bar to select the Week Timer you want to configure.
Here, the Primary Week Timer is not shown due to the fact that it is the default one.

You can choose to set countless Secondary Week Timers, depending on your needs,
so scroll the bar to select the one you want to configure (one per time).
Once done, tap on the dates of the calendar in which the selected Secondary Week Timer needs to be considered. All the selected days will be
surrounded by a

 Temporary lock
To access timers configuration mode, tap and hold the home icon, then click on the strong>Temporary lock icon. Once selected, the home icon will begin to flash of a different color (blue). From now on, you will be able to navigate within the user interface until you will long press the home icon again. Navigate within your user interface and tap the component you want to apply a Temporary lock to.
Temporary lock is used to block the execution of a timer or a logic operation executed by components such as: Logic, If Then or Week Timers. This function has top priority compared to other logic or other settings made previously, this means that except in the case of the Scenario, which in this case would not be overwritten, the Temporary lock will always have priority over everything.

New Event
In order to add a New Event click on the icon on the top right corner of the Temporary Timer.
Once done, the Event Configuration Screen is displayed in front of you. Here you set a new event for the selected component.
Tap on the day on the Week Line to choose from/to which days of the week you want to set the event to. All the selected days are surrounded by a colored circle. Below, the keypad allows to input the time of the event.
On the right side of the last day chosen you can find the bin icon to delete the Event, on the top left corner the arrow icon to go back to the user interface.

 Single Event Timer
To access timers configuration mode, tap and hold the home icon, thenclick on the desiredclock icon. Once selected, the home icon begins to flash of a different color (orange).
From now on, you are allowed to surf within the app interface using the timers configuration mode until you will long press the home icon again. Navigate through your user interface and tap on an objectfor which you want to set a timer to.
Single Event Timers is used to trigger an event such as turning off a light only for one time, after that the timer will auto delete. This Timer has top priority compared to other logic or other settings made previously, this means that except in the case of the Scenario, which in this case would not be overwritten, the Temporary Timer will always have priority over everything.
New Event
To add a New Event click on the icon on the top right corner of the Single Event Timer. Once done, the Event Configuration Screen is displayed in front of you. Here you set a timer for the selected object.
Tap on the day on the Week Line to choose the day of the week you want to set the timer
On the right of side of the Timer that you have created, you find the bin icon to delete the Timer, on the top left corner the arrow icon to go back to the user interface.

Recording Scene Configuration
The system EVE allows the management of countless scenes. This is helpful to eliminate repetitive
operations and speed up the control of the building. EVE Remote Plus app allows also the record of
personal scenes directly through the user interface without EVE Manager configuration software.
The Remote Scenario is a module which needs to be added on your user interface using EVE
Manager configuration software. This is an object that allows recording customized scenes
to perform with a simple button within your user interface.
User Scenario Configuration Mode
1– In order to start recording, hold down on “Remote Scenario” command icon for longer than a second and click the red circle on the top right of the window.
2– You know you are in recording mode due to the fact that Home icon will become completely red and start blinking indicating that recording mode is active.
3– From now on, any command subjected to state changes that depend on the user’s will be registered. It is possible to move within the app interface and select any change: lights, dimmers, temperature, etc.
4– You can save the registration at any time by clicking longer than a second on the “Remote Scenario” icon.
5– Remote Scenario command icon will return back to the original color and the Home menu icon will stop flashing to indicate that the registration status has been finished.

Rec Scene
Tap and hold the Remote Scenario icon to access the recording scene configuration mode. Once you also clicked the red circle, the home icon begins to flash of a different color (red). Navigate through your user interface and command the objects that you want to add to your scene:
- Turn on / turn off switches and lights;
- Dim lights to a customized percentage;
- Open/close shutters and blinds;
- Power on / power off the A/V system;
- Activate / deactivate the alarm system;
- Increase/decrease the room temperature or set a mode.
When you think the registration is complete, tap and hold the initial Remote Scenario icon to exit the recording scene configuration mode and confirm the registration.
From now on, simply tap on that Remote Scenario icon to trigger the scene you have just recorded.
Remote Scenario icon to exit without editing the recorded scene.
Reset Scene
In order to reset a Remote Scenario to reconfigure it, tap and hold the Remote Scenario icon to access the recording scene configuration mode,
then tap and hold the Remote Scenario icon again.
Without making any new changing, the Remote Scenario will record “no actions” which means you delete the previous recording and it brings the configuration to the initial state.
Now it will be possible to record a new scene as explained in the above paragraph.